
Short answer: making a public building accessible comes down to four core elements: a ramp at the entrance (no steeper than 1:12), tactile paving along the route of travel, grab rails on stairs and in sanitary rooms, and Braille signage on rooms and escape routes. This guide works through the dimensions, materials, installation sequence and cost drivers for each of them.
Why it matters
Accessibility is not only a regulatory requirement. A wheelchair user, an older person with a walking stick, an employee with a temporary injury, a parent with a pram — all of them meet the same obstacle. A single step closes an entire building to them.
In practice, accessibility work is often done in a rush at handover. The result is a ramp that is far too steep, tactile paving laid in the wrong place, or a grab rail barely holding in the wall: money is spent, yet the space still cannot be used. A solution thought through at the design stage is always cheaper and works better.
Regulatory requirements: what to rely on
In Uzbekistan, making public buildings accessible is governed by the current construction norms and state standards. These are reflected in the project documentation and checked when a building is handed over.
An important note: normative documents are updated periodically, and requirements differ by building type — a school, a hospital, a shopping centre and a transport hub are not treated the same way. The specific document and its current edition should therefore be verified by the designer or the client at the design stage. The dimensions below are values that are stable in international practice and recur in most standards; they serve as a starting reference but do not replace project documentation.
What gets decided at the design stage
Most of accessibility is settled on paper, not on site. The design stage determines whether space has been allocated for a ramp at the entrance, which sanitary room will be adapted, whether the route to the lift is continuous, and whether door widths are sufficient. Changing these decisions later means breaking walls, opening floors and relocating services — the cost multiplies.
A practical tip when reviewing a design: ask one question — can a wheelchair user enter from the street, reach the room they need, use the sanitary facilities and get back out? If the answer is "no" at any point on that route, that point is still cheap to fix on paper.
Who checks it
In practice the requirements surface at three points: design review, the handover commission, and later inspections by supervisory bodies. In all three the question is the same: what has been installed, at what dimensions, and is there documentation to prove it. Receiving products with technical documentation and keeping it in the building file is therefore practically useful.
Key dimensions: where everything comes from
Every requirement derives from one thing — the real dimensions of a person and a wheelchair. Knowing these figures lets you check many decisions yourself.
| Parameter | Value | What it affects |
|---|---|---|
| Wheelchair width | ~70 cm | Door and passage widths |
| Clear door opening | from 90 cm | Entrance, rooms, sanitary room |
| Corridor width | from 120 cm | Movement in one direction |
| Turning space | ~150 cm diameter | Sanitary rooms, tight spaces |
| Reach range | 85-110 cm | Buttons, handles, sockets, counters |
| Ramp slope | no steeper than 1:12 | Overcoming a change in level |
| Ramp width | from 90 cm | Passage of one wheelchair |
| Landing at ramp top | from 150×150 cm | Stopping to open the door |
| Grab rail height | 70-85 cm | Comfort of support |
| Grab rail diameter | 32-50 mm | Full grip of the hand |
| Sign height | 120-160 cm | Reading and tactile reach |
These values are interrelated. A sanitary room needs 150 cm of turning space, which means the position of the toilet and washbasin must not intrude into that clear circle. Or: a door must open to 90 cm — this is not the width of the leaf but the clear passage width, accounting for the handle and the thickness of the door.
The three dimensions most often forgotten
The landing. Without a horizontal landing at the top of a ramp, the whole ramp fails: a person cannot open the door while holding position on a slope. This is the most expensive mistake, because fixing it means rebuilding the structure.
Reach range. Call buttons, intercoms, sockets, counters and information stands should sit between 85 and 110 cm. In practice they are often installed "at eye level" — convenient for someone standing, out of reach for someone seated.
The threshold. A 2-3 cm threshold looks trivial but is a serious obstacle for a wheelchair. Thresholds should be as low as possible and ideally chamfered. Levelling a handful of thresholds often opens up an entire building.
Types of equipment
1. Ramps
A ramp is an inclined plane used to overcome a change in level. Its most important figure is the slope. The normative ratio for public buildings is 1:12: every 1 cm of rise needs at least 12 cm of ramp length. A 40 cm step therefore requires roughly 4.8 metres of ramp.
The ratio is not arbitrary. Above 1:12 the force needed to propel a wheelchair independently rises sharply — many people cannot manage it, and on the way down there is a risk of losing control. Ramps at 1:8 or 1:10 are common in practice: they appear in the report, but they cannot be used.
The main types:
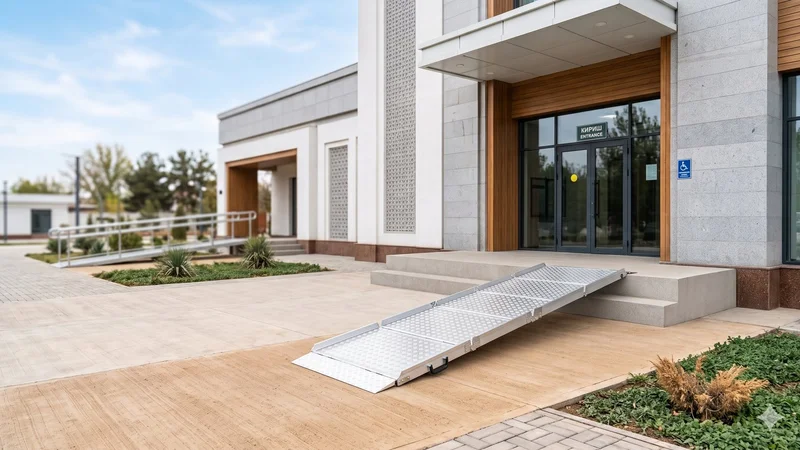
- Portable (folding) ramps — aluminium, lightweight, folding in half. For a threshold or an entrance of two to four steps. Ready to use within minutes of unpacking and easy to store. Suitable for rented premises or as a temporary solution.
- Telescopic (channel) ramps — two rails of adjustable length. They adapt to different heights, but self-propelling is harder; they are usually used with an assistant.
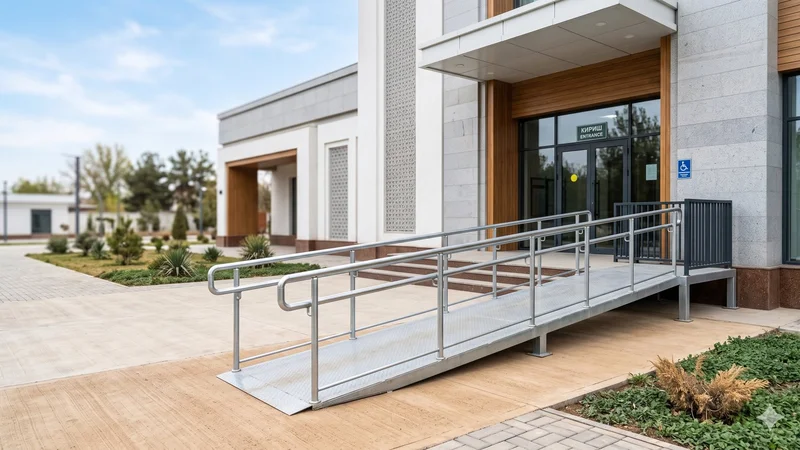
- Fixed ramps — permanent structures on a steel frame or concrete base. The only correct solution for an entrance in constant use. A chequered surface reduces slipping, with a kerb and handrail along the edges.
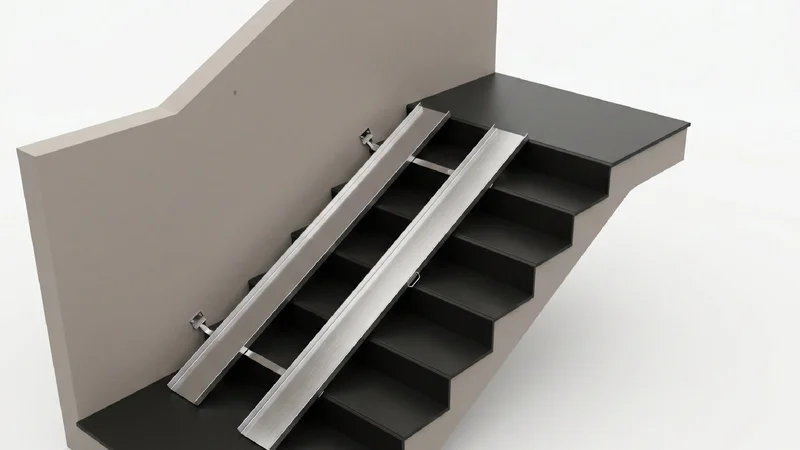
- Stair rails — channels laid along steps. Intended for prams and loads rather than wheelchairs; they do not satisfy accessibility requirements on their own.
Load capacity is typically 300 kg (standard) or 500 kg (reinforced). That covers the chair, the user, an assistant and additional load with a margin.
2. Tactile paving and indicators
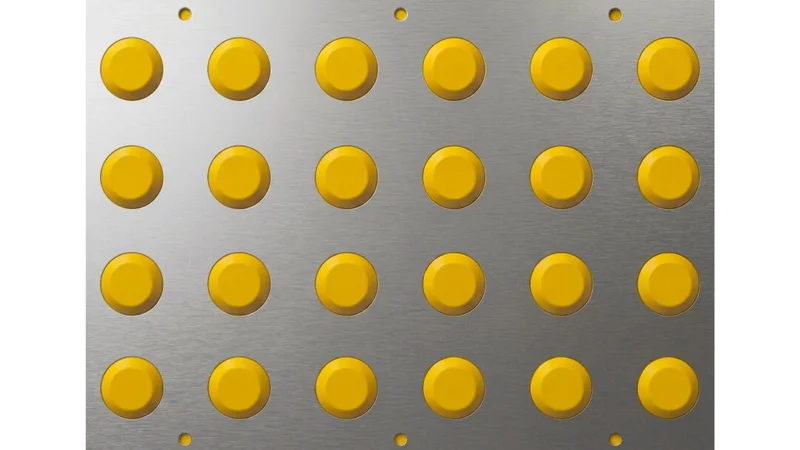
Tactile paving is a raised surface read through the foot or a cane. It conveys two different messages to a person with a visual impairment, and comes in two corresponding types:
- Warning (cones or dots) — "stop, there is a hazard or a decision point ahead". Laid at the top and bottom of stair flights, before pedestrian crossings and at platform edges.
- Directional (bars) — "travel in this direction". It forms a continuous route across a long corridor, lobby or open area.
Confusing the two is the most common mistake. Bar paving in front of a staircase tells the person to keep going, when they need to stop.
Material is chosen by location:
| Material | Where | Characteristics |
|---|---|---|
| PVC | Indoors | Light, inexpensive, easy to install; wears faster under heavy traffic |
| Stainless steel | Indoors and outdoors | The most durable option; higher price |
| Rubber | Indoors, wet areas | Anti-slip, absorbs noise |
| Concrete / stone | Outdoors | Integral with the paving, resistant to vandalism |
3. Grab rails and supports
A grab rail provides balance and support. It is used on stairs, in corridors, in sanitary rooms and beside lifts.
Key dimensions: tube diameter 32-50 mm — the range in which fingers wrap fully around the rail; installation height 70-85 cm from the floor; enough clearance from the wall for the hand to pass freely. Material is stainless or powder-coated steel; in sanitary rooms, resistance to moisture and disinfectants is decisive.
Fixing is the part most often overlooked. Rails are anchored into the wall, and brick, concrete and plasterboard each need a different solution. A rail fixed into plasterboard without a reinforcing plate works loose within months. Correctly installed, a rail supports a point load of over 100 kg.
4. Signage, tactile maps and Braille
Wayfinding is the invisible but most-used part of accessibility. Three elements work together:
- Tactile signs — with raised text and Braille. Mounted beside the room door, on the handle side rather than the hinge side, at 120-160 cm from the floor.
- Tactile maps — a raised plan of the floor or the building. Placed at the entrance so a route can be formed in advance.
- Contrast and illuminated signage — for people with partial sight. Contrast and letter size are chosen by viewing distance: the further away, the larger the letters.
5. Platform lifts
Where there is no room for a ramp, or the change in level is large, a vertical solution is used. There are two main types: a vertical platform lift (a small platform within one storey) and a stair lift (a platform running on rails). Both cost more than a ramp and need servicing, but they save space.
Three things matter when choosing: the platform load capacity, the height of the control panel (a seated user must reach it) and what happens during a power cut. A lift must be inspected regularly — a lift that does not work is no different from a missing ramp.
6. Call systems and sanitary equipment
Not every place can be fully adapted — a heritage building or a narrow entrance, for instance. A staff call button gives an interim solution: the visitor presses the button and a member of staff comes out to help. The button must be within reach (usually 85-110 cm) and visible at the entrance.
In a sanitary room the core requirements are clear space for a wheelchair to turn, supports on both sides of the toilet, a washbasin with knee clearance and a door that opens outwards.
Core rules
- Ramp slope no steeper than 1:12 — 12 cm of length per 1 cm of rise
- Do not confuse warning and directional tactile paving
- Grab rail diameter 32-50 mm, height 70-85 cm
- Signs at 120-160 cm, with Braille
- Load capacity: 300 kg standard, 500 kg reinforced
- Verify the specific normative document at the design stage
What each building type needs
There is no universal list — requirements depend on who moves through the building and how. Below are the priorities for the most common types.
Schools and children's facilities
The primary user here is a child, so dimensions differ from adult ones. Grab rails are installed in two rows: 70-85 cm for adults and roughly 50-60 cm for children. The tactile route must run continuously from the entrance to classrooms, the canteen and the sanitary rooms. On wayfinding signs the pictogram matters more than the text — a child who cannot yet read must still understand. Sports halls and support rooms are often forgotten, although children go there too.
Hospitals and clinics
The highest demands are here: a large share of visitors have limited mobility, and many are arriving for the first time. A continuous tactile route is needed from the entrance to reception, then on to consulting rooms and sanitary facilities. Corridors need continuous rails, and waiting areas need seats with armrests. Materials must withstand disinfection — cleaning happens several times a day with aggressive agents. Call buttons are fitted both outside consulting rooms and inside the accessible toilet.
Shopping centres and service facilities
Large floor areas and multiple levels make wayfinding the main problem. A tactile map at the entrance, warning paving in front of lifts and raised floor numbers are all needed. Warning paving before escalators is essential. In the car park, the accessible bay is wider than standard and placed closest to the entrance — with both horizontal (on the surface) and vertical (on a post) markings.
Offices and administrative buildings
Here the user is permanent — an employee. The entire route to the workstation has to work: entrance, lift, corridor, office, kitchen, sanitary room. Frequently the entrance is adapted while the route breaks down inside. Meeting rooms and reception areas count too.
Transport facilities
At stops and stations the tactile route is the critical element: the warning strip at a platform edge is a safety matter. Ticket counters and information stands must be within reach. Audible information supplements visual information rather than replacing it.
Installation, step by step
Step 1: survey and audit
On site the route of travel is traced: what obstacles a person meets from the street door to the room they need. Changes in level, door widths, corridor turns and the state of the sanitary rooms are measured. This step establishes what is needed and what is not — the list often halves.
Step 2: solution and calculation
The survey produces a schedule and a layout: what goes where and at what size. Ramp length is calculated here, the tactile paving area is derived and rail lengths are set. The output is an exact calculation rather than an estimate.
Step 3: preparation
The substrate is checked: floor finish, wall material, fixing points. Plasterboard gets reinforcement, uneven floors are levelled. Skip this step and everything works loose later.
Step 4: installation
Installation usually takes 1-3 days depending on scale. Portable items are handed over in a day; a fixed ramp and a large tactile paving area take longer.
Step 5: verification and documentation
At completion everything is tested in practice: drive the route in a wheelchair, pull on the rails, read the signs. A paper check does not work here — many defects only appear when the route is travelled end to end. Technical documentation is handed to the client and kept in the building file together with the warranty papers.
The seven most common mistakes
The following recur on site again and again. Each one leads either to wasted money or to redoing the work.
- The ramp is too steep. With no room available it is built at 1:8 or 1:6. The report says "ramp installed"; in practice it cannot be used independently. The correct answer is a two-flight ramp with a turning landing, or a platform lift.
- There is a ramp but no landing at the top. The ramp runs straight into the door. The user has to free a hand to open it while holding position on the slope. A horizontal landing at the top is essential.
- The tactile paving type is swapped. Directional bar paving is laid in front of a staircase — a signal to keep going. A hazard calls for warning cone paving.
- The tactile route breaks off. Present at the entrance, absent in the corridor, reappearing at the lift. A broken route is not a route; the user loses direction in the gap.
- A rail fixed straight into plasterboard. With no reinforcing plate. Within months it works loose and stops being a support — which is dangerous, because people rely on it.
- A sign on the hinge side of the door. When the door opens the sign disappears behind the leaf. It belongs on the handle side, on the wall.
- The sanitary room door opens inwards. Once the wheelchair is inside the door cannot be closed, and in an emergency helping from outside is harder. The door should open outwards or slide.
Maintenance and operation
Installed equipment needs upkeep over time. The routine is simple:
- Tactile paving — cleaned regularly. If dirt builds up between the cones, the surface stops being readable. Abrasives are not used.
- Grab rails — fixing points checked and tightened at least once a year.
- Portable ramps — hinges and catches inspected, along with wear on the anti-slip surface.
- Call systems — battery state and signal reception tested periodically. A button that does not work means a system that does not work.
- Signage — check that the Braille dots have not worn down and the text is legible.
A short checklist
To assess a building yourself, answer the questions below. Every "no" is work that needs doing.
- Can the change in level from the street to the entrance be crossed?
- Is the ramp no steeper than 1:12, with a landing at the top?
- Is the entrance door wide enough for a wheelchair?
- Is there warning tactile paving at the top and bottom of stairs?
- Are there rails on both sides of the staircase?
- Is the tactile route continuous from the entrance to the main rooms?
- Is there warning paving and a raised floor number at the lift?
- Is there room to turn in the sanitary room, and are supports fitted?
- Do room doors carry Braille signage?
- Is a call button fitted where adaptation is not possible?
What drives the price
The cost of accessibility work depends on four factors:
- Quantity — tactile paving is measured in square metres, rails in linear metres, ramps by unit and length.
- Material — stainless steel costs more than PVC but lasts longer outdoors and under heavy traffic. A cheap material chosen for the wrong location has to be replaced within a couple of years.
- Preparatory work — levelling the substrate, reinforcing walls and removing old finishes are costed separately.
- Location — delivery and sending a crew outside Tashkent add to the price.
A practical note: costing the whole building once works out cheaper than ordering in pieces, because delivery and installation happen in a single visit. Large facilities get a separate commercial offer, and tenders and public procurement require a document package.
Material selection mistakes
A separate category of waste is material chosen for the wrong place. The most frequent cases: PVC paving on an outdoor entrance step (one season of temperature swings and it lifts), ordinary painted steel in a sanitary room (rust appears around the fixings within a year) and rubber flooring in a high-traffic area where it wears through quickly.
The rule is simple: establish the conditions first — outdoors or indoors, humidity, traffic intensity, cleaning agents used — and only then select the material. The price difference between the right and the wrong option is usually smaller than the cost of installing twice.
What accessibility work does not solve
It is worth understanding the limits. Equipment removes physical barriers but does not replace organisational measures. If the ramp is there but the entrance door is locked and the bell is mounted too high, the barrier remains. If the tactile route leads to a reception desk but staff do not know how to assist a blind visitor, the route breaks down in the final metre.
Two simple steps are worth adding to the technical work: a short staff briefing (how to offer help without grabbing someone's chair) and naming a person who walks the checklist once a quarter. Neither costs anything, and both noticeably improve the return on what has already been spent.
If the budget is limited: where to start
In practice most facilities cannot do everything at once. Order matters here — money spent in the wrong sequence produces no result. The list below is ranked by impact.
- The entrance. If a person cannot get into the building, nothing inside matters. A ramp or a levelled threshold is the first expense.
- The main route. From the entrance to the most-used point: reception, till, consulting room. Tactile route and rails along it.
- The sanitary room. It determines how long someone can stay. Without an accessible toilet, a long visit is impossible.
- Wayfinding. Signs and tactile maps have value once the route already works.
- Remaining areas. Meeting rooms, kitchen, support spaces.
As an interim measure a call button works: it is inexpensive, quick to fit and needs no structural change. But it is not a permanent solution — it does not enable independent movement, only the ability to ask for help. Counting it as "accessible" is wrong.
Where to buy and what to look for
Three things matter when choosing a supplier:
- Is a site survey offered. A price quoted without visiting the building is almost always wrong.
- Is installation done in-house. Buying the product and finding fitters separately splits responsibility. With a single supplier the warranty stays whole.
- Is documentation provided. A product without technical documentation creates problems at handover.
Qulay Makon supplies and installs accessibility equipment across Uzbekistan: ramps, tactile paving, grab rails, Braille signage and call systems. Survey and consultation are free — you can arrange a site visit through the contact page or by phone.
Conclusion
Accessibility is not a difficult engineering problem — it is mostly a matter of attention and sequence. Four elements (ramp, tactile route, support, wayfinding), about ten dimensions, and one principle: a person should be able to come in from the street, reach what they came for and leave again — without anyone else's help.
The most common problem is not technical: accessibility gets done at the last minute, for the report. Planned at the design stage it costs less and actually works. If you do not know where to start with your building, work through the checklist above or arrange a free site audit.
Frequently asked questions
Is accessibility only for wheelchair users?
No, and this is the most widespread misconception. In practice the range of users is much broader: older people with walking sticks, anyone with a temporary injury, people with visual or hearing impairments, pregnant women, parents with prams and people carrying heavy loads. A ramp and a continuous rail serve them all — so the spend targets a significant share of visitors, not a small group.
Can a portable ramp replace a fixed one?
For an entrance in constant use, no. A portable ramp has to be fetched from storage, unfolded and positioned, which means another person's help every time. That is not independent movement. Portable versions suit temporary situations, rented premises, or places where a fixed structure is not possible.
How do I calculate the ramp slope?
Multiply the rise by 12. A 30 cm rise needs 3.6 metres, a 50 cm rise needs 6 metres of ramp. If there is not enough room, the options are splitting the ramp into two flights with a turning landing, or installing a platform lift.
Does tactile paving need to cover the whole building?
No. It is laid at decision points and where hazards exist: the top and bottom of stairs, the entrance, the area in front of lifts, and changes of direction. Over-laying turns information into noise and reduces its value.
Can an older building be adapted?
In most cases yes. A ramp at the entrance, supports in the sanitary room and a tactile route in the corridor can be added without major rebuilding. Where there are structural limits, a call button and staff assistance provide an interim solution.
How long does the work take?
For an average building, one to two weeks from survey to handover. Installation itself is usually 1-3 days; the rest goes on agreeing the solution, manufacturing and delivery.
What if there is no room for a ramp?
There are three options: split the ramp into two flights with a turning landing, install a vertical platform lift, or — as a temporary measure — arrange staff assistance via a call button. The first is cheapest, the second most convenient, the third only an interim step.
Does tactile paving work outdoors in winter?
Yes, if the material is right. Outdoor locations use frost- and moisture-resistant steel or concrete versions. PVC paving is made for indoor use — outdoors it will need replacing after a single season.
Does the whole building have to be adapted at once?
No, the work can be phased. But the order matters: entrance and main route first, then the sanitary room, then wayfinding. Starting from the other end — putting up signs inside while the entrance stays inaccessible — means the money produces no result.
Who is responsible: the owner or the tenant?
Responsibility is usually set by the lease. Structural changes — a ramp, widening a doorway, rebuilding a sanitary room — normally fall to the building owner, while items inside the unit such as signage, a call button or a portable ramp fall to the tenant. It is worth clarifying this before work starts, so you do not pay to redo something that belongs to the other party.
Is a warranty provided?
Yes, products come with a warranty and are handed over with technical documentation. Technical support continues after installation and spare parts are held in stock.